Introduction to CCV Reroute/Delete for L5P Duramax
Your truck's CCV (Crankcase Ventilation) system is essential—it allows built-up pressure and oil vapors inside the engine to escape safely. However, the factory CCV setup can cause problems, like carbon buildup and reduced engine performance over time.
By installing a CCV reroute or delete kit—like the one from SPETUNER—you'll help your L5P Duramax breathe better, maintain cleaner intake systems, and ultimately run smoother and stronger.
In this detailed installation guide, we’ll walk you step-by-step through fitting your truck with SPETUNER's CCV Reroute/Delete Kit, specifically designed for 2017+ GM trucks with the 6.6L L5P Duramax engine.
Installation Preparation
Tools and Materials Needed
Before diving into your L5P CCV reroute install, you'll want to have the right tools handy. Here's what you'll need:
- 10mm and 12mm socket wrench
- Swivel socket adapter (for tight spots)
- Socket extension bars
- Long-nose pliers (for clamps and hoses)
- Zip ties (to secure hoses neatly)
- Lubricant (for easier O-ring fitting)
- Basic safety gear (gloves and eye protection)
Having all these tools ready ahead of time will save you from headaches mid-installation and make the whole process smooth and stress-free.
Safety Precautions
Safety always comes first. Here’s a quick checklist before starting your install:
- Make sure your engine is completely cooled down—hot surfaces can cause serious burns.
- Park your truck on a flat, stable surface to keep things secure and avoid accidents.
- Use protective gloves and safety glasses to keep your hands and eyes safe from sharp parts and fluids.
- Taking a few extra minutes for safety prep goes a long way in making sure your installation is trouble-free.

SPETUNER CCV Reroute/Delete Kit Overview
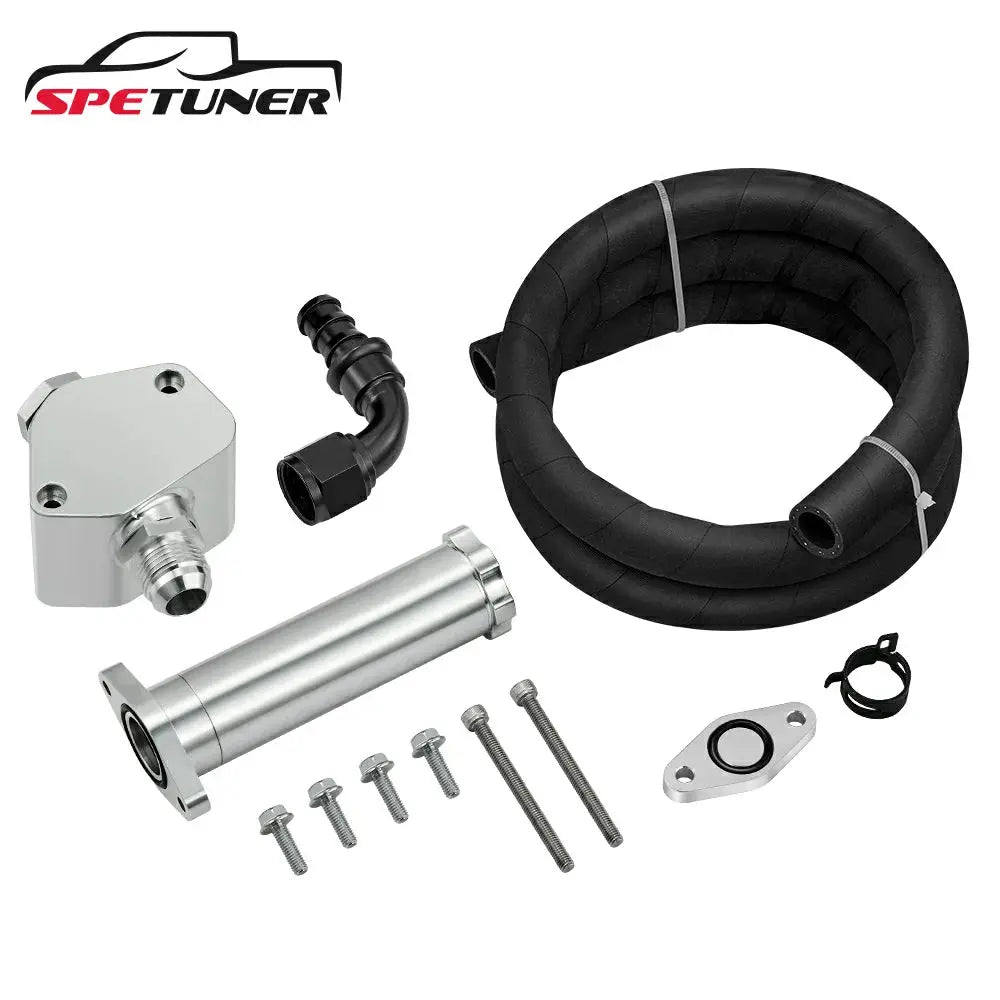
What's Included in Your Kit
Before we jump into the installation, let’s quickly go through what comes in the SPETUNER CCV Reroute/Delete Kit. Knowing exactly what's in the box helps avoid confusion later on.
Here's what you'll find in your kit:
- CCV Filter (if applicable): Designed specifically to catch oil vapors and prevent intake contamination.
- Block-off Plate: Precisely manufactured to securely seal the factory CCV connection point.
- Reroute Hose and Clamps: Durable hose and sturdy clamps for safe and secure installation.
- Mounting Hardware: Includes all necessary bolts, fittings, and zip ties for a clean install.
Make sure to check and confirm all parts are accounted for before you start your installation. If anything is missing or unclear, SPETUNER’s support team is ready to help.
Comparing parts beyond CCV? Here’s an L5P delete kit brand comparison covering EGR/DPF/DEF hardware and tune pairing for off-road builds.
Step-by-Step Installation Guide
Step 1: Removing the Factory CCV Hose
Let's start by carefully removing the factory CCV hose from your Duramax. Begin by disconnecting the intercooler pipe to gain better access.
Next, using your long-nose pliers, gently squeeze and slide back the clamp holding the original CCV hose in place. Take your time—no need to rush this step.
Once the clamp is loose, carefully pull the hose free from its connector. Be gentle to avoid damaging any surrounding components or connectors.
Double-check the area after removal to ensure it's clean and free of debris, ready for the new parts to be installed.
Step 2: Installing the New CCV Filter and Hose
Now that the old hose is out, it's time to install the new SPETUNER L5P CCV reroute and reroute the hose. First, position the CCV filter securely in the recommended mounting location, ensuring it's firmly fixed.
Connect your new reroute hose to the CCV filter, sliding the hose fully onto the fitting. Tighten the provided clamp snugly, but don't overtighten—just enough so it won’t move.
Give the filter and hose a gentle tug to ensure everything’s secure. This quick test can save you from headaches down the road.
Step 3: Installing the Block-Off Plate
With your new filter and hose in place, it’s time to seal the old factory CCV port using the block-off plate from your SPETUNER kit.
Line up the block-off plate with the factory CCV outlet. Reuse the original bolts (or those included in the kit, if specified), and hand-tighten them first to ensure proper alignment.
Once aligned, use your socket wrench to snug the bolts down evenly. Avoid over-torquing—just tighten enough to create a firm seal without damaging the threads.
A proper seal here is key to keeping crankcase pressure where it belongs and preventing leaks.
Step 4: Rerouting the Hose and Securing It
Now let's guide the reroute hose down and away from the engine bay. The goal here is to vent crankcase gases away from heat sources and moving parts safely.
Route the hose toward the lower frame rail or along the firewall, depending on your preferred layout. Make sure the hose doesn’t touch the exhaust manifold or any sharp edges.
Use the included zip ties to secure the hose to existing brackets or frame sections. Leave a little slack near the filter to avoid strain, but keep the routing neat and stable.
Lastly, double-check that the hose exit is clear and pointing downward—this helps oil vapor and condensation escape properly without splashing back onto components.
Post-Installation Checks and Test Run
Step 5: Final Inspection Before Start-Up
Before firing up the engine, take a few minutes to inspect everything:
- Ensure all clamps are tight and secure.
- Verify the block-off plate is fully sealed with no gaps.
- Confirm the hose is routed safely—no rubbing, no kinks, no exposure to hot surfaces.
- A quick visual and manual check now can prevent leaks or performance issues later.
Step 6: Start the Engine and Monitor
Go ahead and start the truck. Let it idle for a few minutes and listen closely—there should be no hissing, whistling, or vibrations from the installation area.
Check for any signs of leaks around the block-off plate and hose fittings. If everything looks and sounds good, take the truck for a short drive to verify smooth operation.
Keep an eye on engine response and idle behavior. Everything should feel normal—if something seems off, shut down and recheck your work.
Maintenance Tips and Common Issues
Routine Filter Maintenance
If your kit includes a CCV filter, it’s a good idea to check it every few oil changes. Over time, the filter may collect oil mist and begin to clog, reducing its effectiveness.
To clean, remove the filter and use a degreaser or solvent-safe cleaner. Let it dry completely before reinstalling. If your setup uses a replaceable filter element, swap it out according to the manufacturer’s recommendation (typically every 10,000–15,000 miles).
Keeping the filter clean helps maintain optimal crankcase ventilation and prevents pressure buildup.
Common Issues After Installation (and Fixes)
If you notice any of the following, here’s what to check:
- Oil smell in the cabin: Ensure the reroute hose vents far enough under the truck and doesn’t allow vapor to drift upward.
- Engine light or erratic idle: Double-check hose connections and the block-off plate seal.
- Hose movement or rattling: Use additional zip ties to better secure routing points.
Catching these early and making a quick adjustment keeps your setup running clean and trouble-free.
Vehicle Compatibility and Purchase Guidance
Compatible Models for the SPETUNER CCV Reroute/Delete Kit
This kit is specifically engineered for:
- 2017–2024 Chevy Silverado HD with the 6.6L L5P Duramax diesel engine
- 2017–2024 GMC Sierra HD equipped with the same L5P 6.6L Duramax platform
If you’re unsure whether your truck fits this range, check your VIN or consult your owner’s manual. SPETUNER’s customer support can also help verify compatibility.
Installing a kit designed for your exact model ensures perfect fitment, no extra mods, and peace of mind.
Where to Buy and Support Options
You can purchase the L5P CCV reroute directly from our official store:
Need help with installation or choosing the right product? Our support team is made up of real diesel enthusiasts ready to assist with fitment questions, installation advice, and troubleshooting tips.
Final Thoughts
Installing the L5P CCV filter on your 2017+ L5P Duramax isn’t just a maintenance upgrade—it’s a smart investment in your truck's long-term health and performance.
This kit helps your engine breathe cleaner and run stronger by reducing oil mist buildup in your intake and keeping crankcase pressure under control. With SPETUNER’s precision-fit design, you’ll get a clean install without the guesswork.
If you're ready to cut down on carbon buildup and take control of your engine’s breathing system, grab your L5P CCV reroute kit today—and enjoy the drive, cleaner and stronger.
Order Now: SPETUNER CCV Reroute/Delete Kit for L5P Duramax
Got questions? Drop a comment or reach out to the team—we’re always here to help.