TL;DR:
Installing an EGR delete kit on a 2008–2010 Ford 6.4L Powerstroke involves completely removing the factory vertical and lower EGR coolers, the EGR valve, and rerouting the coolant system. The process typically requires 4 to 6 hours of labor. Crucially, a custom race tuner is mandatory alongside this mechanical modification to prevent diagnostic trouble codes (DTCs) and keep the engine out of limp mode. The core workflow includes: draining the radiator, pulling the degas bottle and driver-side battery for access, extracting the dual coolers, installing the exhaust block-off plate and new intake elbow, and securely sealing the coolant lines.
Before you start: This is a detailed step-by-step text guide. If you prefer looking at pictures, you can also check out our original image-style 6.4L Powerstroke EGR Delete Kit Instruction here.

Why 6.4L Powerstroke Owners Delete the EGR System
If you own a 2008–2010 Ford 6.4L Powerstroke, you already know the engine has a reputation. It's a powerful diesel, but Ford's factory Exhaust Gas Recirculation (EGR) system is one of the biggest weak points on the platform.

Here is the basic problem. The EGR system takes hot, dirty exhaust gas and sends it back into the intake manifold. This lowers combustion temperatures, which reduces certain emissions. But it comes with real costs:
- Soot and carbon build-up — Dirty exhaust gas coats the intake manifold, EGR cooler passages, and even the turbo vanes. Over time, this restricts airflow.
- EGR cooler failure — The 6.4L runs two EGR coolers (a vertical one and a lower one). They are known to crack or fail. When they fail, coolant mixes with engine oil or enters the cylinders. That can mean a hydrolocked engine and a very expensive repair bill.
- Overheating — A clogged EGR system raises coolant temperatures and can lead to repeated overheating events.
- Reduced power and fuel economy — A dirty, restricted intake means the engine works harder to make the same power.
If you are tired of these problems, removing the EGR system eliminates all of these issues at once. This 6.4 Powerstroke EGR delete kit step-by-step installation guide is perfect for you. We have put together the most detailed 42-step guide to help you or your mechanic safely install an EGR Delete Kit for the 2008-2010 Ford 6.4L Powerstroke. Following these steps will help you avoid common mistakes during the full EGR cooler and EGR valve delete.
⚠️ Important Legal Disclaimer — Please Read First
This product is legal for off-road competition use only. It is not legal for sale or use on pollution-controlled motor vehicles operated on public streets, roads, or highways in the United States.
- Federal law and many state laws prohibit tampering with emissions equipment on street-driven vehicles.
- Violations can result in fines of up to $32,500 per vehicle — or more.
- Installing this kit may void your vehicle's factory warranty.
- You assume all responsibility for ensuring your vehicle complies with all applicable laws.
- Check your local, state, and federal laws before purchasing or installing this product.
Pre-Installation Checklist: What You Need
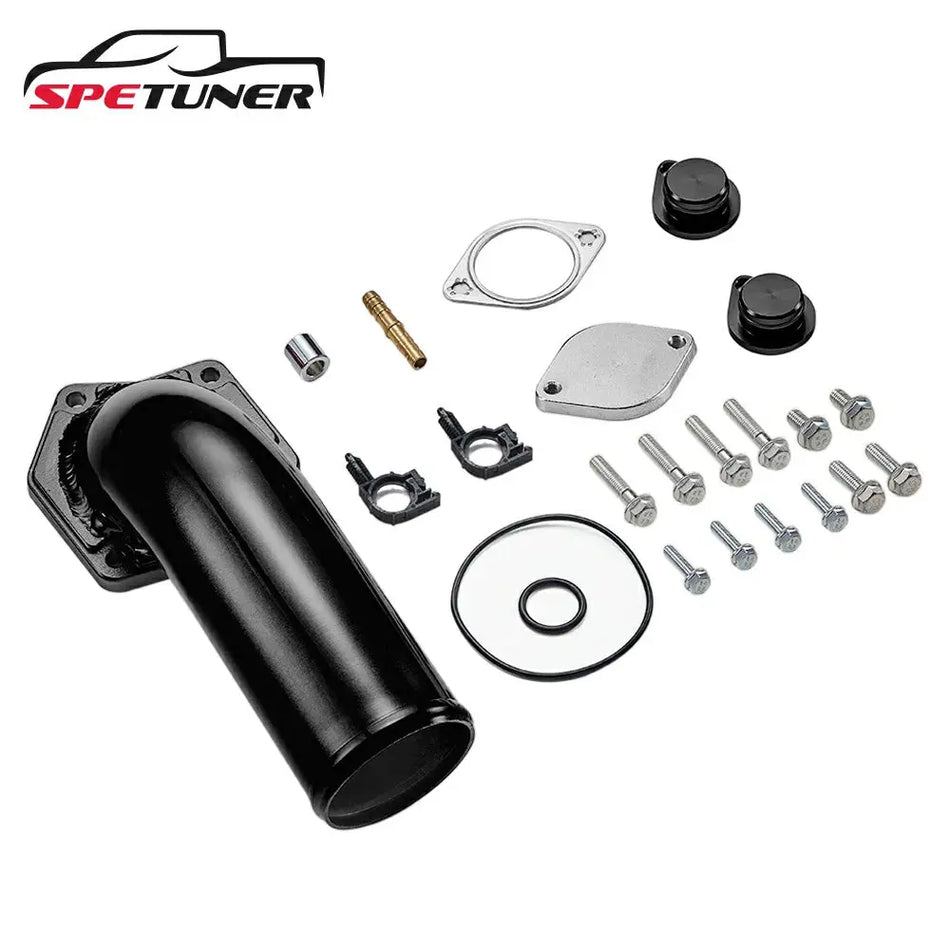
📦 What's in the 6.4 Powerstroke EGR Delete Kit Box
Before you start, open the 6.4L Powerstroke EGR Delete Kit and verify you have all of the following parts. Lay them out on a clean work surface so nothing gets lost.
| Qty | Part | Notes |
|---|---|---|
| 1 | Exhaust Block-Off Plate | Seals the exhaust manifold EGR port |
| 1 | Exhaust Gasket | Used with the block-off plate |
| 2 | Coolant Line Plugs with O-rings | Blocks open coolant ports left by the EGR coolers |
| 1 | Brass Barbed Hose Connector | Reconnects the coolant line over the radiator |
| 1 | Stand-Off Spacer | Used to re-mount the power steering line stud |
| 4 | M10-1.25 × 40 Hex Head Bolts | Exhaust manifold replacement bolts |
| 2 | M8-1.25 × 25 Hex Head Bolts | General mounting hardware |
| 2 | M8-1.25 × 16 Hex Head Bolts | General mounting hardware |
| 4 | M6-1.25 × 25 Flanged Hex Head Bolts | Secures the intake elbow to the intake manifold |
| 2 | Plastic Hose Routing Clips | Secures coolant line over radiator |
| 1 | Intake Elbow with O-ring | Replaces the EGR valve; connects intake manifold to intercooler boot |
Required Tools
- 10mm and 13mm wrenches and sockets
- Pliers and a flathead screwdriver
- Clean the drain pan to catch coolant
- Glass cleaner (for cleaning the silicone boot)
- Hose cutters
Estimated Time
This job usually takes about ⏱ 4 to 6 hours for a first-time install, depending on your mechanical experience.
If you have done this before or are comfortable working on diesel engines, you may finish in 3–4 hours. Take your time. Rushing is how plastic coolant tubes get broken.
Before you read, we want to notice this is a step-by-step text guide, you can also read our image guide.
Phase 1: Preparation & Teardown (Steps 1–9)
First, we need to clear space so we can reach the EGR parts.
Disconnect Batteries & Drain Coolant (Steps 1-3)
- Step 1: Make sure the front wheels are straight.
- Step 2: Disconnect both batteries.
- Step 3: Drain the coolant using the coolant drain plug. You can find this on the bottom of the radiator on the driver's side.
💡 Pro Tip: Save the drained coolant in a clean container if it is relatively new. You can reuse it after the install.

Remove Degas Bottle & Battery Tray (Steps 4-8)
- Step 4: Remove the 3/8" hose that runs to the degas bottle (coolant overflow tank). Keep this hose, as you will use it again later.
- Step 5: Remove the upper radiator hose. Pop the wire clip out and pull the hose straight out.
- Step 6: Remove the driver-side battery.
- Step 7: Remove all coolant hoses going to the degas bottle. Also, take off the vent line going to the battery tray.
- Step 8: Remove the battery tray and degas bottle. This is held in place by four bolts.

Loosen Intercooler Tube (Step 9)
- Step 9: Loosen the clamp on the driver-side intercooler tube. Separate the tube from the rubber boot. Note: You do not need to fully remove the tube.

Phase 2: Removing the Factory EGR Coolers (Steps 10–23)
This is the most involved part of the job. The 6.4L has two EGR coolers — a vertical cooler near the top of the engine and a lower (horizontal) cooler sitting deeper in the engine bay. Getting both out requires patience and good access. Work carefully.
Remove the Vertical EGR Cooler (Steps 10–13)
Step 10. Disconnect the electrical connector on top of the vertical EGR cooler.
There is a single electrical connector at the top of the vertical EGR cooler. Squeeze the release tab and unplug it.
Step 11. Disconnect the coolant lines on the vertical EGR cooler. Remove the nuts and bolts holding the two coolers together, then release the mounting clamps and separate them by prying on the flanges.
Take your time with the mounting hardware. Once the bolts are out, the two coolers are joined at a flange. Use a small pry bar on the flanges to separate them — they may be stuck together from heat and time.

Step 12. Hold the intercooler tube back and pull the vertical EGR cooler up and out.
You may need to rotate the cooler slightly to clear the mount. Hold the intercooler tube out of the way with your free hand or a bungee cord while you work the cooler loose.
Step 13. Remove the plastic coolant tube.
This plastic tube will be reinstalled later, so handle it carefully. Do not force it or twist it aggressively — it is brittle and easy to crack.
⚠️ Warning: If you crack this tube, it will leak coolant after the install. Treat it gently.
Remove the Upper Radiator Hose & Steering Shaft (Steps 14–16)
Step 14. Remove the upper radiator hose from the thermostat housing.
With the hose off, inspect the connection. If your hose has a single O-ring, this is a great time to swap it for a new double O-ring version. The double O-ring seal is more reliable and helps prevent leaks long-term.
💡 Pro Tip: This is a cheap upgrade that can save you a headache later.
Step 15. Remove the upper EGR cooler mount.
Use a 10mm wrench to remove the three bolts holding the mount. Use a 13mm wrench to remove the stud. Keep the stud — you will use it to re-secure the power steering line during reassembly.

Step 16. Remove the steering shaft bolt and slide the shaft up and out of the steering box.
This gives you the clearance needed to reach the lower EGR cooler bolts.
⚠️ Critical: Do NOT turn the steering wheel or move the tires after disconnecting the shaft. If the steering wheel spins freely while disconnected, it can damage the clock spring — an expensive fix.
Remove the Lower EGR Cooler (Steps 17–23)
Step 17. Remove the nut that secures the dipstick tube.
The dipstick tube runs right next to the lower EGR cooler. Moving it out of the way gives you the room you need for the next steps.

Step 18. Release the mounting clamps on the lower EGR cooler.
These clamps can be tricky to reach. Try approaching from different angles — sometimes the best access is from below the truck.
Step 19. Remove the coolant line on the lower EGR cooler. It may be easier to cut it.
This coolant line will not be reused. If it is too stiff to disconnect by hand, go ahead and cut it. It is getting replaced anyway.

Step 20. Remove the bolts on the rear flange of the lower EGR cooler.
The bottom bolt is easier to reach from underneath the truck. The top bolt is easier to reach from above. Take off your ratchet extension and use a wrench if space is tight.
Step 21. With the dipstick moved aside, pull the lower EGR cooler forward and rotate it out of its mount.
It may feel stuck. Keep applying steady forward pressure while rotating slightly — it will come loose.
Step 22. Remove the bolt securing the coolant line to the timing cover.
This coolant line is attached to the lower EGR cooler mount and comes out as one complete piece with the mount.

Step 23. Use a 10mm wrench to remove the four bolts on the lower EGR cooler mount.
With these bolts out, the entire lower EGR cooler mount assembly lifts free. The engine bay should now look a lot more open.
Phase 3: Installing the EGR Delete Kit Components (Steps 24–38)
With both EGR coolers and the lower mount removed, you are now ready to install your new delete kit parts. Work methodically through the steps below.
Install the Ford 6.4 Exhaust Block-Off Plate & New Bolts (Steps 24–26)
Step 24. Install the four replacement bolts (M10-1.25 × 40) into the exhaust manifold and torque to factory specs.
These new bolts replace the ones that came out with the lower EGR cooler mount. Use a torque wrench and follow Ford's factory torque specifications for exhaust manifold bolts on the 6.4L.
Step 25. Install the exhaust block-off plate using M10-1.125 × 20 bolts and the included gasket.
Position the gasket first, then set the block-off plate over it. Thread the bolts in by hand before torquing them evenly in a cross pattern.
💡 Pro Tip: Tighten in a crisscross pattern to ensure even sealing pressure on the gasket.

Step 26. Re-mount the dipstick tube with the factory bolt.
Thread it back in and snug it down. Don't over-tighten — it just needs to be secure.
Install the Coolant Plugs on Your 6.4 Powerstroke (Steps 27–30)
Step 27. Remove the coolant tube that connected the vertical EGR cooler to the engine block, and install the coolant plug from the kit.
The kit includes a coolant plug specifically for this port. Push it in firmly and use the factory mounting bolts to secure it.

Step 28. Install the second coolant plug from the kit using the factory bolts that secured the original coolant lines.
Make sure the O-ring on the plug is properly seated before tightening. A misaligned O-ring is a guaranteed coolant leak.
⚠️ Warning: Double-check both O-rings are seated correctly before moving on.
Step 29. Use a 13mm wrench to reinstall the stud with the included stand-off spacer. Then secure the power steering line to the stud.
You saved this stud back in Step 15. The kit includes a stand-off spacer that takes the place of the EGR cooler mount that was removed. Once the stud is torqued in, clip the power steering line to it.
Step 30. Reinstall the plastic coolant tube.
This is the same tube you carefully removed in Step 13. Gently flex it back into position. If it feels stiff, warm it up slightly in the sun before reinstalling.
⚠️ Warning: Do not force it. If it cracks, it will leak.

Reconnect the Steering Shaft, Battery Box, & Intercooler Tube (Steps 31–35)
Step 31. Reconnect the steering shaft and torque the bolt to factory specs.
Slide the shaft back down into the steering box shaft and thread the bolt in. Verify the wheels are still pointing straight before torquing.
Step 32. Reinstall the battery tray and degas bottle.
Set both back into position and reinstall the four mounting bolts. Make sure they are fully tightened.
Step 33. Reconnect all coolant hoses to the degas bottle and the vent line to the battery box.
Go back and reconnect every hose that you removed in Step 7. Don't leave any loose — a disconnected coolant hose will drain your system after startup.
Step 34. Clean the silicone boot and intercooler tube with glass cleaner, then reconnect the tube.
The glass cleaner helps the tube slide back into the boot smoothly. Push it in fully, then tighten the clamp until it is snug.
Step 35. Reconnect the upper radiator hose and confirm the metal wire clips are fully seated.
Push the hose all the way in and snap the wire clip back into the groove. Give it a light tug to confirm it is locked.
Remove the EGR Valve & Install the Intake Elbow (Steps 36–38)
Step 36. Disconnect the wire connectors on the EGR valve.
There are two electrical connectors going to the EGR valve. Squeeze the release tabs and unplug both.

Step 37. Remove the four bolts and loosen the hose clamp on the intercooler plumbing to remove the EGR valve.
With the bolts and clamp loose, the valve lifts free. You will not be reinstalling this part.
Step 38. Install the new intake elbow by sliding its tube end into the intercooler boot. Secure the flange to the intake manifold with the supplied M6-1.25 × 25 bolts.
Make sure the O-ring on the elbow is fully seated before tightening. Thread the four bolts in by hand first, then tighten them evenly in a cross pattern.
💡 Pro Tip: This anodized blue intake elbow is now the only thing connecting your intercooler to the intake manifold — no more EGR valve in the way.

Phase 4: Final Routing & Testing (Steps 39–42)
You are almost done. These last four steps reconnect the coolant system and confirm everything is working properly before you button it all back up.
Step 39. Use the 3/8" hose from Step 4 and the brass barbed hose connector from the kit to reconnect the coolant line over the radiator to the degas bottle.
Cut the hose to the correct length so it runs cleanly without kinks. Reuse the factory hose clamps on both ends. The brass barbed connector from your kit makes the splice between the existing hose and the new routing.
💡 Pro Tip: Hold the hose up in position before cutting to get the right length — measure twice, cut once.
Step 40. Secure the coolant line over the radiator with the two plastic hose routing clips from the kit.
Clip the hose into place so it doesn't flop around or contact anything hot. Proper routing prevents chafing and wear over time.

Step 41. Refill the coolant system to factory specifications.
Use a Ford-compatible 50/50 pre-mix or the correct ratio of Ford Gold coolant and distilled water. Fill slowly and let air burp out. Top off as needed.
💡 Pro Tip: The 6.4L cooling system holds roughly 19–20 quarts. Have at least 5 gallons of fresh coolant on hand.
Step 42. Reconnect both batteries, start the engine, and check for leaks.
Let the engine warm up fully and watch for any coolant weeping from the coolant plugs, hose connections, or the block-off plate. Check the coolant level again once the thermostat opens and top off if needed.
⚠️ Warning: Do not drive the truck until you have confirmed there are no leaks and the coolant level is correct.

This kit gives you everything needed to remove the EGR coolers and valve on your 6.4L. Includes the blue intake elbow, block-off plate, and all hardware shown in this step-by-step guide.
Why You Must Tune Your 6.4L After an EGR Delete
🚨 Don't Skip This Step
This is the most important thing to understand about any EGR delete: removing the hardware is only half the job.
Your 6.4L Powerstroke's ECM (engine computer) is programmed to expect EGR sensors, the EGR valve position, and EGR cooler temperature readings. When those parts are physically gone, the ECM notices right away. Here is what happens if you drive without a tune after the delete:
- ❎ The Check Engine Light (CEL) turns on immediately.
- ❎ The truck may enter Limp Mode — limiting power and RPM to protect the engine (which now reads as "faulty").
- ❎ You lose any performance or fuel economy benefit from the delete because the ECM is still commanding the deleted systems.
- ❎ In some cases, the truck may not pass a basic emissions inspection, even in states where off-road use is permitted.
A proper EGR delete tune tells the ECM to stop looking for the deleted sensors, disables the associated fault codes, and recalibrates fueling and timing for the cleaner, cooler intake charge you now have. This is where you actually unlock the performance and reliability benefits of the delete.
The Easiest Way: An All-in-One 6.4 Delete Kit
If you haven't already, the smartest way to handle both the hardware and the tune at the same time is to go with a complete all-in-one 6.4 Powerstroke Delete Kit. The one we recommend for the 6.4L covers the EGR delete hardware plus the DPF (Diesel Particulate Filter) and DEF system — giving you a full emissions-system delete in one package.

Get everything you need in one package. This kit includes the EGR delete, DPF pipe, and the required race tuner to clear codes and stop limp mode. Save time and money by getting it all at once.
Conclusion
Completing an EGR delete on your 2008–2010 Ford 6.4L Powerstroke is one of the most impactful upgrades you can make to protect the longevity of your engine. By removing both EGR coolers and the EGR valve, you eliminate the #1 cause of catastrophic 6.4L engine failures — and you free the engine to breathe cleaner, cooler air on every single combustion event.
After a proper retune, most owners notice:
- Lower coolant temperatures under load
- A cleaner, soot-free intake manifold over time
- Improved throttle response and power delivery
- Better fuel economy at highway speeds
- Peace of mind knowing the EGR cooler failure mode is gone for good
If you have questions about fitment, tools, or which complete kit is right for your build, reach out to the SPEtuner team directly. We are diesel people and we are happy to help you get it right.
Ready to Upgrade Your 6.4L Powerstroke?
Browse our full lineup of 6.4L delete kits, EGT sensors, cold-air intakes, and more. Every part is spec'd specifically for the 2008–2010 Ford diesel platform.
Shop 6.4L Powerstroke Parts →FAQ
Q: Will an EGR delete improve my 6.4L's MPG?
A: Yes, in most cases. The factory EGR system introduces heat and soot into the intake, which hurts combustion efficiency. Removing it — and retuning the ECM — lets the engine use clean, cool air for combustion. This typically results in measurable fuel economy gains, especially on the highway. Real-world results vary based on driving habits and what tune you are running, but gains of 1–3 MPG are commonly reported after a full delete and retune.
Q: Can I install this kit myself, or do I need a mechanic?
A: This is a DIY-friendly install if you are comfortable doing basic engine work. You do not need any special equipment beyond standard hand tools and a torque wrench. Most mechanically inclined truck owners finish it in one afternoon. That said, if you have never done major engine work before, having an experienced friend guide you through the EGR cooler removal (Steps 10–23) is a smart idea — that section requires the most patience and confidence.
Q: Do I have to drain the entire cooling system?
A: Yes. The EGR coolers are fed by the engine's cooling circuit, so you need to drain the system completely before removing them. Make sure you have a proper-sized drain pan and enough fresh coolant on hand to refill. The 6.4L holds a large amount of coolant, so plan accordingly.
Q: What is the difference between just deleting the EGR vs. doing a full delete?
A: An EGR-only delete removes the EGR coolers and valve, which is the biggest reliability fix for the 6.4L. A full delete also includes removing the DPF (Diesel Particulate Filter) and the DEF (Diesel Exhaust Fluid) system. Many owners choose to go all the way at once with the all-in-one kit, since you are already deep in the engine bay anyway. This maximizes performance gains and minimizes the number of times you have to do the disassembly.
Q: Why is my 6.4L Powerstroke so prone to EGR cooler failure?
A: Ford designed the 6.4L with two EGR coolers in series, which means the system passes hot exhaust gas through a large amount of cooling hardware on every cycle. The thermal stress from constantly heating and cooling the cooler cores causes them to crack over time. When a cooler cracks, coolant leaks into the exhaust stream — or worse, into the engine. It is a fundamental design weakness that the EGR delete resolves permanently by removing those components from the equation entirely.

Lars
Diesel Performance Engineer | 15+ Years EXPERIENCE
"Empower Your Beast: Run Cooler, Pull Harder, Last Longer."