Written by Lars – SPETUNER Diesel Modification Specialist
If you’re here, you’re ready to take full control of your 6.7L Cummins. The EGR Delete Kit helps reduce soot build-up and simplifies the engine bay for off-road use. In this guide, I’ll walk you through the process of removing the factory EGR components and installing the block-off plates and coolant reroute.
This guide is based on a 6.7L Cummins-equipped Ram (2010–2024), but the process is very similar across these model years. Always compare what you see on your truck with the steps below and your specific kit contents.
Before You Begin
1. Safety First
- Work on a cold engine to avoid burns from hot coolant, exhaust parts, or metal surfaces.
- Wear eye protection and gloves when working under the hood.
- Disconnect the negative battery terminal before you start to prevent accidental shorts and protect electronic components.
- Support the truck securely if you need to crawl underneath (use jack stands, not just a jack).
2. Know the Law
- This EGR Delete Kit is intended for off-road/competition use only.
- Removing or disabling emissions equipment is illegal for on-road use in many regions.
- Always check and comply with your local, state, or national regulations.
- Installing this kit on a vehicle used on public roads may violate emission laws and can void your factory warranty.
3. Vehicle Compatibility
This guide applies to:
- 2010–2024 Ram 2500 / 3500 / 4500 / 5500
- Equipped with the 6.7L Cummins diesel engine
If your engine bay layout looks significantly different, stop and verify compatibility before continuing.
4. Unbox and Verify Your Kit
Lay out all parts from your 6.7L Cummins EGR Delete Kit and verify you have:
- Intake side block-off plate (for the intake elbow where the EGR valve used to be)
- Front/exhaust manifold block-off plate
- Rear/exhaust manifold block-off plate
- Coolant reroute hoses
- Coolant riser hose (engine block to riser)
- Coolant support bracket (black bracket)
- Hose clamps
- Hardware (nuts/bolts as specified, if supplied)
- Any O-rings / gaskets, where included
If anything is missing or damaged, do not start the install. Contact support for help before you tear the truck down.
Looking for a More Complete Performance Upgrade?
At Spetuner, we understand that an EGR delete is often just the first step in your build. That is why we offer more than just individual plates. We specialize in all-in-one Cummins delete kits that simplify your 6.7L diesel modification process.
Our comprehensive catalog for the 6.7 Cummins includes:
- Full Delete Bundles: Includes EGR, DPF, DEF, and CCV delete kits for a total system overhaul.
- Performance Tuning: Pre-loaded truck tuners to unlock horsepower and manage codes.
- Exhaust Components: High-flow mufflers, downpipes, up pipes, and polished exhaust tips to improve flow and sound.
Whether you are looking for diesel performance upgrades or simple reliability mods, we have the specialized hardware to get the job done right.
Tools You’ll Need
Typical tools required:
- Metric socket set (including 8mm, 10mm, 13mm, 15mm commonly used on Cummins EGR hardware)
- Ratchets and extensions (a deep socket is very helpful for some clamps/bolts)
- Combination wrenches
- Torx or Allen/hex bits (for brackets where required)
- Flathead screwdriver or pry tool (for hose and clamp removal)
- Pliers (for spring clamps)
- Drain pan for coolant
- Thread sealant (if any coolant fittings are removed/reinstalled)
- Shop rags or paper towels
Step-by-Step Installation
You can also watch this video for a more detailed installation:
If you are looking for more specific Cummins EGR delete kits installation guides, welcome to read below:
- SPETUNER EGR Delete Kit Installation Guide for 2007-2009 Dodge Ram 6.7L Cummins Diesel
- 2010-2012 Dodge Ram 6.7L Cummins EGR Delete Kit Installation Guide
- SPETUNER 2013-2018 Dodge Ram 6.7L Cummins EGR Delete Instruction
- DIY EGR Delete for 2019+ Dodge Ram 6.7L Cummins: Complete Step-by-Step Guide
Step 1: Loosen and Remove the EGR Crossover Tube (Intake Side)
Locate the EGR crossover tube running from the EGR cooler to the EGR valve / intake elbow.

Loosen the clamps at both ends of the crossover tube. A deep socket often makes this easier.

Disconnect any sensors, plugs, and clips attached to the tube or its brackets.
Remove all mounting bolts or brackets holding the crossover tube to the engine.

Carefully remove the crossover tube from the engine bay and set it aside.
Make sure no sensors or wires are still attached before pulling the tube out.
Step 2: Remove the EGR Valve from the Intake Elbow
Locate the EGR valve bolted to the intake elbow on the top/side of the engine.
Unplug the electrical connector to the EGR valve.


Remove the bolts holding the EGR valve to the intake elbow.
Carefully remove the EGR valve and any attached housing.
Remove the old gaskets from the intake elbow surface. Make sure no pieces fall inside the intake.
Your delete kit includes new gaskets / block-off plates where needed, so you do not need to reuse the old valve.
Step 3: Install the Intake Block-Off Plate
Clean the intake elbow mounting surface where the EGR valve used to sit. It should be smooth and free of debris.
Place the new gasket (if provided) on the intake elbow.
Position the intake block-off plate over the gasket.

Use the supplied hardware or reuse the original bolts (as applicable) to fasten the plate.
Tighten the bolts evenly in a cross pattern so the plate seals flat against the intake elbow.
This seals the intake side so no exhaust gas can enter from the old EGR path.
Step 4: Remove EGR Cooler Brackets, Heat Shields, and Sensors (Exhaust Side)
Now we move to the exhaust side, where the EGR cooler assembly lives.
Follow the original EGR cooler from the exhaust manifold area toward the front of the engine.
Remove any heat shields covering the cooler and related hardware.
Disconnect all sensors, plugs, and wiring attached to the EGR cooler (including temperature and pressure sensors).
Remove the brackets and fasteners that hold the EGR cooler to the engine and exhaust manifold.
Keep hardware organized. Some bolts will be reused later with the block-off plates.
Step 5: Disconnect the CCV Connection and Protect the Exhaust Manifold
Locate the CCV (crankcase ventilation) connection at the valve cover that ties into the EGR cooler area.
Disconnect the CCV connection at the valve cover and set the line aside so you have more room to work.

Before anything can fall into the exhaust manifold, install the front exhaust manifold block-off plate:
Use the original exhaust manifold gasket.
Reuse the factory nuts/bolts to secure the new block-off plate in place.
Snug the hardware down evenly to ensure a good seal.
Do this block-off plate early so no debris or hardware can accidentally fall into the open exhaust port.
Step 6: Remove the Valve Cover (for Coolant Hose Clearance)
To avoid cutting or trimming certain plastic areas, the installer in the video removes the valve cover.
Remove all the valve cover bolts.

Carefully lift the valve cover straight up and set it in a clean area.
This gives you more room to move the coolant hose out of the way without cutting or grinding plastic.
Step 7: Drain Coolant and Disconnect Coolant Hoses
If you have not drained coolant yet, prepare a drain pan now.
Either partially drain the cooling system or be ready for some coolant loss when disconnecting hoses.
Disconnect the coolant hose attached to the EGR cooler (this may be near the coolant riser and block).
Expect some coolant to spill – this is normal.
Cap or plug open lines if needed to reduce drips while you work.
Step 8: Remove the EGR Cooler and Bracket Assembly
With all exhaust manifold hardware for the cooler removed, gently pry the EGR cooler backward away from the manifold.

Once it is free, lift the cooler up and out of the engine bay. This may require a bit of wiggling.
Remove the EGR cooler bracket that supports it on the exhaust manifold:
There are multiple bolts holding it from underneath the bracket.
Remove all these bolts and take the bracket out of the engine bay.

At this point, the full EGR cooler assembly and its main bracket should be removed.
Step 9: Install the Rear Exhaust Manifold Block-Off Plate
Now that the cooler and bracket are gone, we can seal the remaining exhaust port.
Clean the exhaust manifold sealing surface where the rear of the EGR cooler used to mount.
Reinstall the original gasket, if it is in good condition, or replace as needed.
Place the rear block-off plate onto the manifold.
Reuse the factory hardware to secure the plate.
Tighten the bolts/nuts evenly so both block-off plates (front and rear) are sealed with their original hardware and gaskets.
At this stage, your EGR gas path is fully blocked at both the intake and exhaust sides.
Step 10: Install the Coolant Reroute Hose (Coolant Riser to Engine Block)
With the EGR cooler removed, we must reroute coolant so the system still circulates correctly.
Identify the coolant riser and the engine block port used in the delete kit.
Install the coolant reroute hose from the coolant riser to the engine block:
Slide the hose onto the fittings.
Position the hose clamps but do not fully tighten until routing is confirmed.
Install the black bracket:
This bracket holds the coolant hose in place.
It also supports the exhaust temperature sensor to keep it secure and away from hot/ moving parts.
Tighten the bracket fasteners so the hose and sensor are stable and clear of sharp edges or hot exhaust surfaces.
Step 11: Install the Second Coolant Hose (Engine Block to Coolant Riser)
Install the second coolant hose from the engine block to the coolant riser, as designed in your kit.
In most applications, this hose will need to be trimmed to fit:

Hold the hose in its final route.
Mark the length.
Remove, cut cleanly, and reinstall.
Slide the hose clamps into position on both ends.
Tighten both clamps securely.
With these two hoses and clamps tight, your coolant reroute is complete and the cooling system is closed again.
Step 12: Reassembly
Reinstall the valve cover and torque the bolts to factory spec.

Reconnect the CCV connection at the valve cover or reroute per your setup.
Double-check all sensor plugs, brackets, and wiring you disconnected earlier.
Reinstall any heat shields you intend to reuse, or ensure sensitive parts are protected.
Testing and Final Check
1. Coolant and Leak Check
Refill the cooling system with the correct coolant mix if you lost fluid or drained it.
Start the engine and let it idle.
Check around:
Intake block-off plate
Front and rear exhaust block-off plates
All coolant hose connections and clamps
Look for coolant drips, exhaust leaks, or unusual noises.
2. Warm-Up and System Check
Let the engine come up to operating temperature.
Watch for:
Any warning lights or codes on the dashboard (a tune is recommended).
Overheating or abnormal temperature swings.
Shut the engine off and reinspect all fasteners, clamps, and brackets once more.
If everything is dry and quiet, your EGR delete installation is complete.
Budgeting for Your 6.7 Cummins Build?
Installing an EGR delete is a smart move for longevity, but many owners want to know the total financial picture of a full performance setup. We have published a detailed article about the cost of deleting a 6.7 Cummins.
That guide covers everything from DIY budget kits for older 4th Gen Rams to premium performance bundles for the latest 2024-2025 models. It is the perfect companion to this installation guide if you are still planning your budget for all-in-one delete kits or exhaust upgrades.
Pro Tips from Lars – SPETUNER
Label your parts: Use bags or small containers and label them (e.g., “EGR cooler bolts,” “valve cover bolts”). It makes reassembly or reversal much easier.
Don’t rush: A clean sealing surface and properly routed hoses prevent future headaches. Take the extra minute now.
Use a tune: After deleting the EGR, a proper off-road tune helps prevent codes and optimizes performance.
Watch clearances: Make sure no hoses touch sharp edges or rest on a hot manifold. Heat and vibration can cut a hose over time.
Off-road only: Enjoy the improved reliability and cleaner engine bay—but remember, this setup is for off-road/competition use only.

$109.77
Buy Now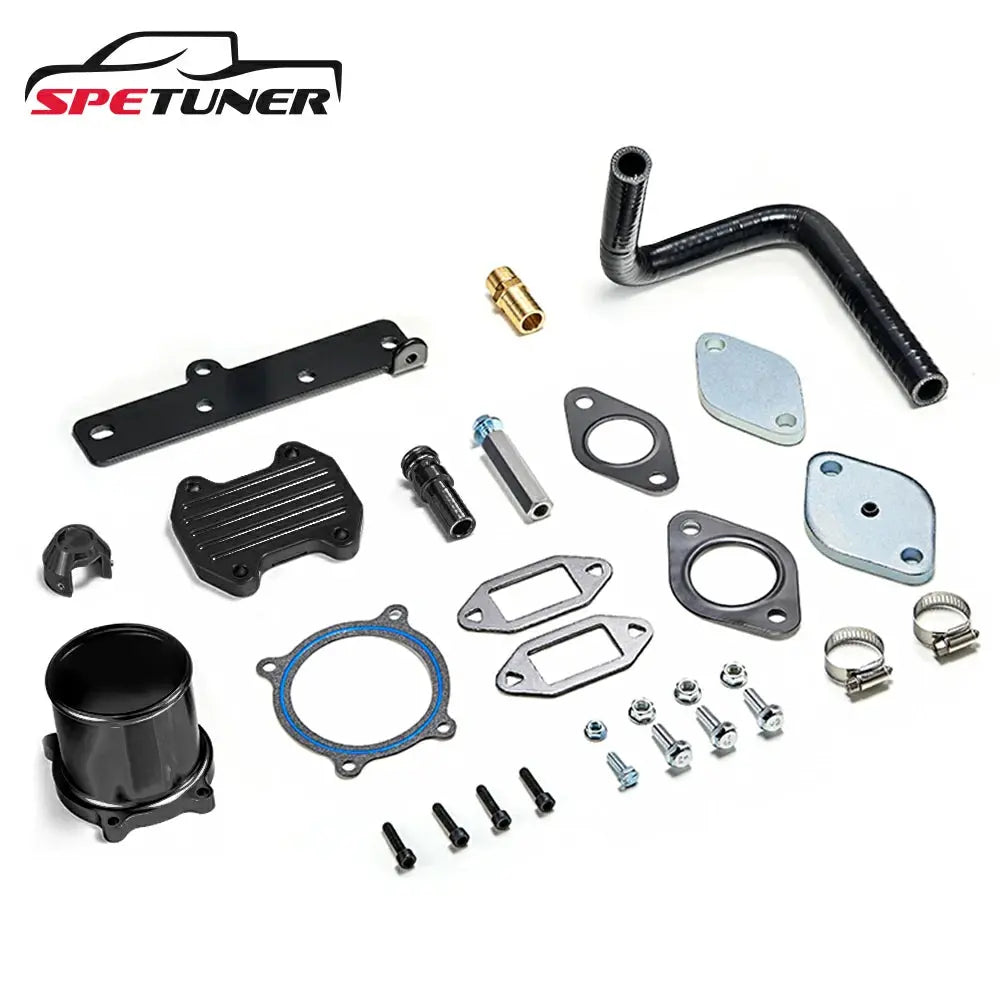
$137.77
Buy Now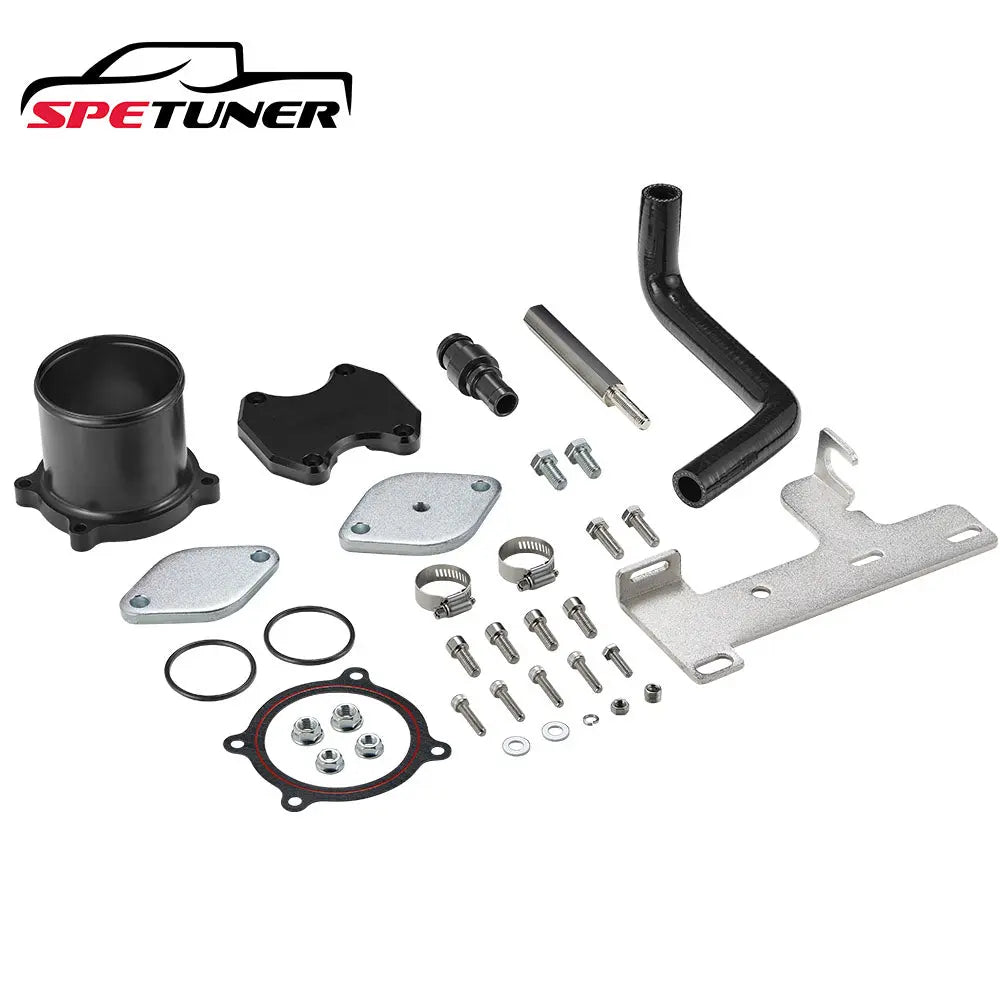
$169.77
Buy Now
FAQs: 6.7L Cummins EGR Delete (2010–2024)
Q1: What does an EGR delete do on a 6.7L Cummins?
A1: An EGR delete blocks the exhaust gas recirculation path, so hot exhaust gas no longer recirculates back into the intake. For off-road use, this can reduce soot build-up, lower intake temps, and simplify the engine bay.
Q2: Is this SPETUNER kit compatible with all 2010–2024 Ram 6.7L Cummins trucks?
A2: The layout is very similar across these years, but small differences can exist. Always compare your truck’s engine bay to the kit instructions and check the product page to confirm exact fitment.
Q3: Will EGR delete cause problems?
A3: When installed correctly and combined with a proper off-road tune, the system can run reliably. Problems usually come from poor installation, leaks, mis-routed coolant, or using the vehicle illegally on public roads.
Q4: Do I have to remove the valve cover?
A4: In the video-based procedure, the valve cover is removed to avoid trimming plastic and to make room for coolant hose routing. Some installers might choose another method, but removing the valve cover gives more space and a cleaner result.
Q5: Will this void my warranty?
A5: Yes. Removing or altering emissions equipment will typically void the manufacturer’s powertrain warranty. Consider this carefully before installing.
Q6: How long does this install usually take?
A6: For an experienced DIYer with the right tools, expect about 2–4 hours. If it’s your first time working on a 6.7L Cummins, plan extra time.
Q7: Do I need to tune my truck after installing the EGR delete kit?
A7: Yes, we strongly recommend a proper off-road tune. This helps prevent check engine lights and ensures fueling and timing are optimized for the new setup.
Q8: Will an EGR delete improve fuel economy?
A8: Many off-road users report smoother operation and potential fuel economy gains, but results vary based on tune, driving style, and overall setup. The main benefit is often reduced soot and improved long-term reliability.
Q9: Can I reverse the EGR delete later?
A9: If you keep your factory parts and hardware, it is possible to reinstall the EGR system, but it will require time and care. Always store your OEM parts in a clean, labeled box.
Q10: Who can I contact if I have issues during the install?
A10: Reach out to SPETUNER support with your truck year, engine details, and photos of your engine bay. We’re here to help you get your 6.7L Cummins set up correctly for off-road use.

Lars
Diesel Performance Engineer | 15+ Years EXPERIENCE
"Empower Your Beast: Run Cooler, Pull Harder, Last Longer."